Saturday 19 January 2013

With Love From The Dollar Store

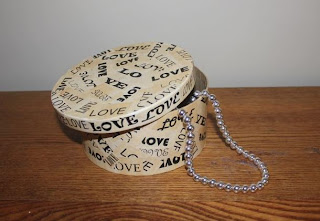
You gotta love a challenge and using materials from the Dollar Store is an economical way to make a super gift box.


I bought this great box for $1 and then typed out a page of the word "LOVE" in all different fonts.  I made a few copies and then used a wet tea bag to stain the pages to look old. 


I was going to use modge podge, but the cost seemed a lot so I used plain white craft glue and watered it down.  After adhering the words I gave it one more coat of the watered down glue and left it to dry.  It's now the perfect box to wrap homemade treats, jewelry or any other gift for that special someone.


If you don't want to miss future posts, go to the right sidebar and subscribe for free by email or to follow on GFC or Google+. Make my day and LIKE us on Facebook pin us above.

Sharing With:
Debbiedoo's Valentine Dollar Tree Party                          An Original Belle
Funky Junk - SNS #171                                                     Elizabeth & Co. #55
Crafty Scrappy Happy #19                                                If It's Not Baroque #5
 Be Different Act Normal                                                  Serendipity and Spice
Common Ground                                                               Made In A Day
French Country Cottage                                                     Diana Rambles
The Thrifty Groove                                                           Sassy Little Lady #3
A Little Knick Knack                                                         Not Just A Housewife
Petite Hermine #94                                                            Fluster Buster


Thursday 10 January 2013

Have a Drink On Us

You might have seen the stool my youngest son made and finished titled Bird On A Stool (okay so it wasn’t the most original name I came up with).  Now my eldest son who is soon to be 16 finally completed his stool that he also made about three years ago (we’re not actually very good at finishing projects in a timely fashion as you can see).


Matt was not about to spend a lot of time sanding or prepping the stool so homemade chalk paint seemed like the obvious answer.  He came up with the design and painted two coats of red paint, sanding lightly in between. 


Next, he took the logo we had photocopied and covered the back with chalk.  He secured it to the stool and traced the outline of the logo so that it left a chalk outline on the stool when he removed the paper.  Then he filled in the outline with white paint and touched up the red.  To make the stool more durable we used two coats of polyacrylic in satin finish.


I hope you agree it looks good enough to drink!! 
 

If you don't want to miss future posts, go to the right sidebar and subscribe for free by email or to follow on GFC or Google+. Make my day and LIKE us on Facebook pin us above.


 What about you, do you try to get your kids involved in your projects?
 
 
 Sharing With:
I Gotta Create Wildly Original Link Party #34                      The Pin Junkie
The Rustic Pig                                                                        Crafty Scrappy Happy
The Inspiration Link Gallery Party Week 17                         The Dedicated House
Elizabeth & Co. Party #51                                              Alderberry Hill
The Shabby Creek Cottage #186                                            A Humble Creation
Debbiedoos - Power Of Pinterest Party                                  An Original Belle
Funky Junk                                                                             A Pinch Of Joy
Savvy Southern Style WOW #101                                         Life On Lakeshore Drive
The Chicken Chick                                                                 Fluster Buster

Friday 4 January 2013

American Girl Crocheted Hats

My neices were over last weekend to celebrate Christmas with us and my mom and they brought along their new American Girl dolls. When they went out tobogganing I thought I would quickly crochet a hat for one of the girls. Of course if you make a hat for one doll, you have to make it for the other doll too. Then we had the brilliant idea of making hats in the same style as my neices which required a total of six pom poms. At one point my sister, my mom, my 15 year old son and my neice were all working on these hats with my husband making the pom pom forms!

crochet American Doll hat


I think they turned out great and as we used leftover wool the total cost was $0 so you can't get more budget friendly than that!!


crochet hat American Doll


American Doll crochet hat

Have you made any "family" projects lately?


If you don't want to miss future posts, go to the right sidebar and subscribe for free by email or to follow on GFC or Google+. Make my day and LIKE us on Facebook pin us above.


Sharing With:


Featured On:

TheRusticPig